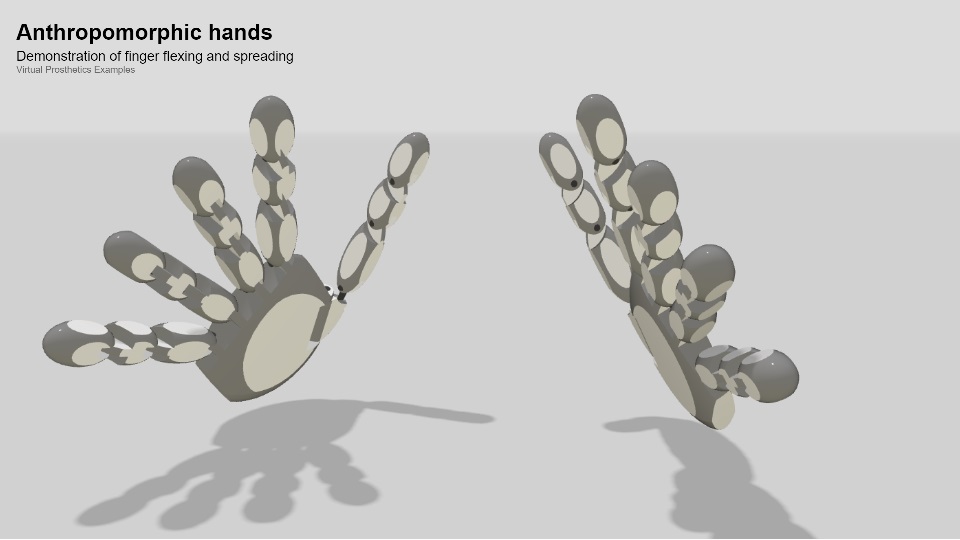
Virtual prosthetics
The Virtual Prosthetics library provides a set of APIs for constructing simple virtual robots. In this document all times are in seconds, all sizes are in meters, all angles are in radians and all indices start from 0.
- USER GUIDE
- INVENTORY
- Robotic hands:
EdgedHand,RoundHand,AnthroHand
– hands control:flexFinger,flexFingers,spreadFinger,spreadFingers - General parts
– common shapes:Ball,Box
– external shapes:GLTFPart,recolor
– motors:MotorX,MotorY,MotorZ - Hand parts
– edged hand:EdgedFinger,EdgedTip,EdgedPalm
– round hand:RoundFinger,RoundPalm
– anthropomorphic hand:AnthroThumb,AnthroPalm
- Robotic hands:
- API REFERENCE
- Scene API:
getScene
–setAnimation,getTime
–setCameraPosition,setCameraTarget - Robot API:
Robot
–attachChain,addChain,addGUI
–getParts,getMotors,getSensors
–getPosition,setPosition,setRotation
–getAngle,setAngle,getAngles,setAngles - Part API:
Part
–addSlot,attachToSlot
–beginContact,endContact
–setPosition,setRotation - Motor API:
Motor,setName
–getAngle,setAngle,flip - Slot API:
Slot
–setPosition,setRotation - Sensor API:
Sensor
–senseDistance,senseTouch,sensePosition
–senseCollision,senseObjects,senseObject
- Scene API:
User guide
The Virtual Prosthetics library allows construction of virtual robots from a JavaScript program. The robots can be viewed and manipulated on desktop and mobile platforms. The library is base on the following main concepts:
- Scene – a virtual environment where robots are placed and controlled;
- Robot – a virtual mechanism constructed programmatically of sevral parts;
- Part – a building element of a robot – a shape, a motor or a sensor;
- Motor – a robot part that can be rotated around a predefined axis;
- Slot – a place on a robot part to which another elements can be attached;
- Sensor – a robot part that can sense its environment and generate feedback.

Building a robot
Installation
Virtual Prosthetics is distributed as a single JavaScript file called
virtual-prosthetics.js. It does not require any specific installation. The
library file could be placed anywhere within the project folder tree or hosten
on a CORS-enabled repository.
The library provides its functionality via modules and it is used within a module script:
<script type="module">
	// JS code
</script>
The library is loaded (and activated) via import statement. The following
example assumes the library is in current folder:
import * as Prosthetic from "./virtual-prosthetics.js";
If the library is activated, it prints the text Virtual Prosthetics 1.0 in the console. Activation creates a virtual scene with the Virtual Prosthetics logo spinning in the center:
Simple robot
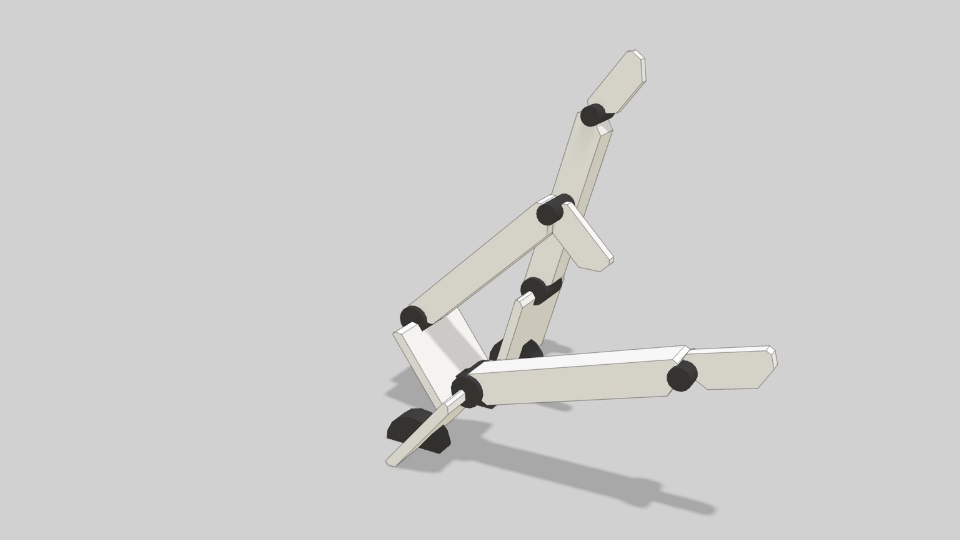
This section describes the construction of a simple robot in several steps. The robot contains three parts and three motors, so that each part can be rotated.
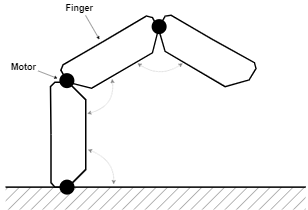
The robot will be constructed in several steps:
- Step 1 – HTML page
- Step 2 – Robot definition
- Step 3 – Robot animation
- Step 4 – Optional customization
- Step 5 – Optional encapsulation
Step 1 – HTML page
The first step is to create the main HTML page. It should have <!DOCTYPE html>
at the very top to indicate this is a HTML5 page. The JavaScript source code is
in <script> tag inside the main <body> tag. The library is loaded with an
import statement, so that all definitions are accessed through Prosthetic.
prefix. The following code create an empty scene:
<!DOCTYPE html>

<body>
	<script type="module">

		import * as Prosthetic from "../build/virtual-prosthetics.js";

		// robot definition
		// robot animation

	</script>
</body>
Step 2 – Robot definition
Robots are defined as instances of Prosthetic.Robot class. The simple
robot, that is being built, contains 6 elements – three motors and three
robot parts. Motors are elements that implement rotation. For the simple robot
rotation is around Z axis, so all three motors are Prosthetic.MotorZ
instances. The three robot parts are Prosthetic.EdgedFinger.
To join all elements in a robot they are attached into a chain with the robot’s
method attachChain. The following code build the robots as the chain
(robot)→motor→finger→motor→finger→motor→finger.
var robot = new Prosthetic.Robot;
	robot.attachChain(
			new Prosthetic.MotorZ,
			new Prosthetic.EdgedFinger,
			new Prosthetic.MotorZ,
			new Prosthetic.EdgedFinger,
			new Prosthetic.MotorZ,
			new Prosthetic.EdgedFinger,
		);
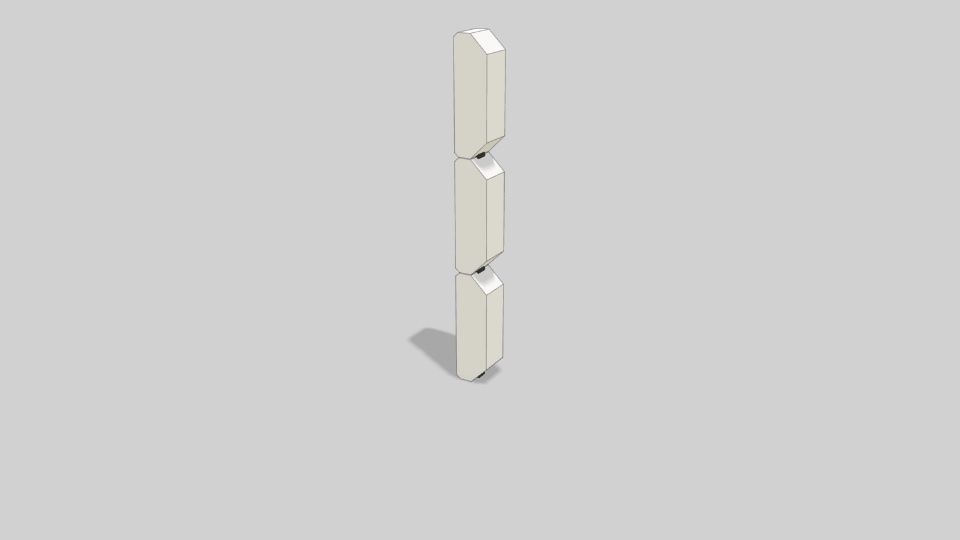
The result is a static robot. The motors are shown as short black cylinders between robot parts:
Step 3 – Robot animation
The animation in Virtual Prosthetics is implemented by a loop function that
is called each animation frame – this usually happens 60 times per second
and is controlled by the browser. This function has a parameter with the
current time, measured since the initialization of the library. What function is
used as a loop function is defined with Prosthetic.setAnimation.
Robots are animated by changing the angles of rotation in their motors. The
robot’s method setAngles sets the angles of all motors –
the order of angles in the method corresponds to the order of motors in the
robot construction.
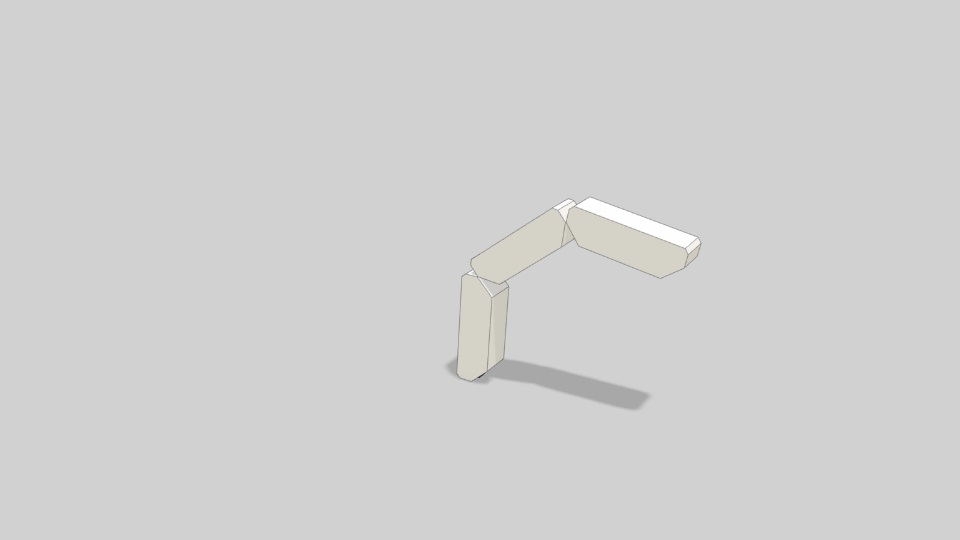
In the following example the first motor is rotated from -0.7 and 0.7 radians. The other two motors are rotated from -1.6 to 0 radians:
Prosthetic.setAnimation( loop );

function loop( t )
{
	robot.setAngles(
		-0.7*Math.sin(t),
		-1.6*(0.5 + 0.5*Math.sin(t)),
		-1.6*(0.5 + 0.5*Math.sin(t))
	);
}
Step 4 – Optional customization
Most elements in Virtual Prosthetics can be customized with a set of optional parameters. For examples, motors may have allowed range of rotation as well as visual sizes. SImilarily, fingers’s proportions can also be changed.
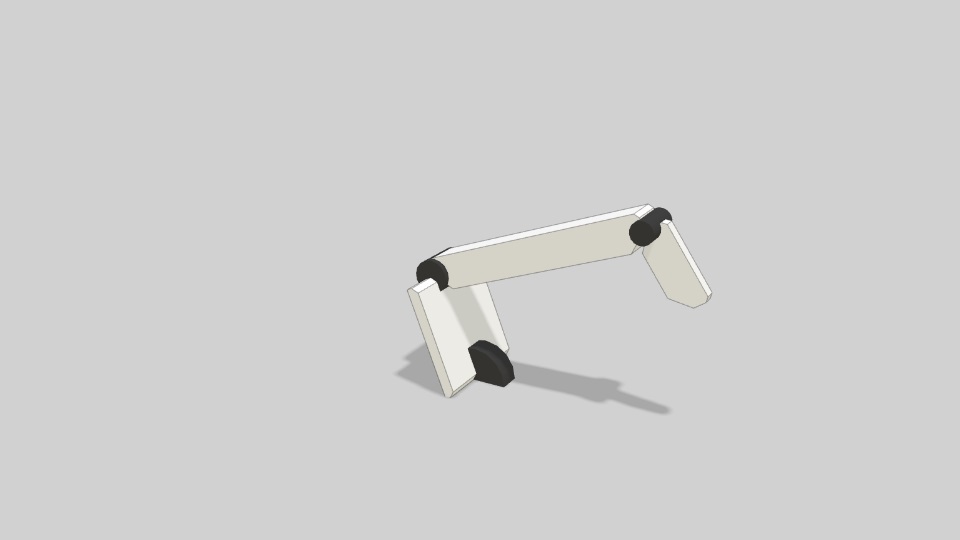
The following example uses differen sizes of robot parts:
new Prosthetic.MotorZ( -0.7, 0.7, 0, 0.2, 0.6 ),
new Prosthetic.EdgedFinger( 1, 1, 0.1 ),
new Prosthetic.MotorZ( -1.6, 0, 0, 0.4, 0.3 ),
new Prosthetic.EdgedFinger( 2 ),
new Prosthetic.MotorZ( -1.6, 0, 0, 0.4, 0.2 ),
new Prosthetic.EdgedFinger( 0.7, 0.1 ),
and different animation that resembles digging motion:
robot.setAngles(
	-0.7*Math.sin(2*t+3),
	-1.6*(0.5 + 0.5*Math.sin(2*t+1)),
	-1.6*(0.5 + 0.5*Math.sin(2*t))
);
Step 5 – Optional encapsulation
Robot encapsulation is the proces of packing robot structure and behaviour in a class. In this way it is easy to create many robots of this kind (i.e. instances of this class).
The following code creates class Digger which is a Prosthetic.Robot. Its
constructor chains customized motors and robot parts and stores the speed
parameter – it is how fast is the robot. The class has method dig which
implements the digging motion for specific time and speed.
class Digger extends Prosthetic.Robot
{
	constructor( speed )
	{
		super( );

		this.speed = speed;
		this.attachChain(
			new Prosthetic.MotorZ( -0.7, 0.7, 0, 0.2, 0.6 ),
			new Prosthetic.EdgedFinger( 1, 1, 0.1 ),
			new Prosthetic.MotorZ( -1.6, 0, 0, 0.4, 0.3 ),
			new Prosthetic.EdgedFinger( 2 ),
			new Prosthetic.MotorZ( -1.6, 0, 0, 0.4, 0.2 ),
			new Prosthetic.EdgedFinger( 0.7, 0.1 ),
		);
	}

	dig( time )
	{
		time = time * this.speed;

		this.setAngles(
			-0.7*Math.sin(time+3),
			-1.6*(0.5 + 0.5*Math.sin(time+1)),
			-1.6*(0.5 + 0.5*Math.sin(time))
		);
	}
}
Once the Digger class is defined, it can be used to create several robots,
each with its own digging speed. The method setPosition is used to separate
the robots, otherwise they all be created at position (0,0,0).
var robotA = new Digger(2);
var robotB = new Digger(3);
var robotC = new Digger(4);

robotA.setPosition( 0, 0, 1 );
robotC.setPosition( 0, 0, -1 );

Prosthetic.setAnimation( loop );

function loop( t )
{
	robotA.dig( t );
	robotB.dig( t );
	robotC.dig( t );
}
Options
Some run-time aspects of the library can be controlled by URL parameters (also called query strings). Some of the parameters are pairs of name=vaue, others are just flags and are only name.
-
engine=‹engine-name›Controls which physics engine to use. Available options are
engine=cannonthat sets Cannon-es as physics engine (default) andengine=nativefor a native engine. Currently on the cannon engine is fully functional. -
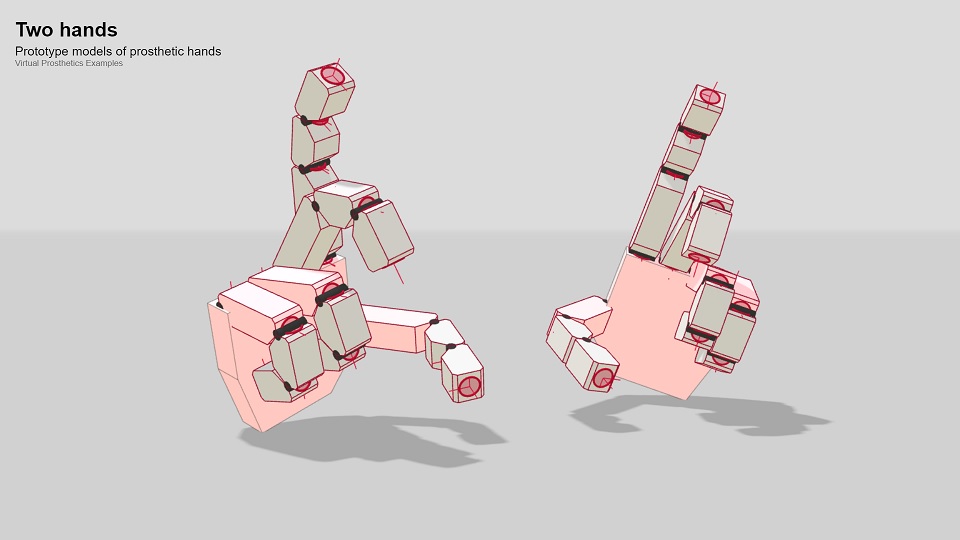
touch-color=‹color-name›Controls the emissive color indication of colliding parts. Any CSS color name can be used, but dark colors have minimal or no effect. For example,
touch-color=crimsonadds a pale pinkinsh color to parts, whiletouch-color=blackdoes not produce any effect. -
debug-physicsShows how the physics engine “sees” the parts. Each part has an invisible convex envelope that is used for collision testing. If th flag
debug-physicsis used, the edges of the envelope are shown. By default they are hidden. -
show-slotsShows the positions and orientations of all slots. By default slots are hidden.
Example:
../examples/two-hands.html?engine=cannon&touch-color=crimson&debug-physics&show-slots
INVENTORY
Robotic hands
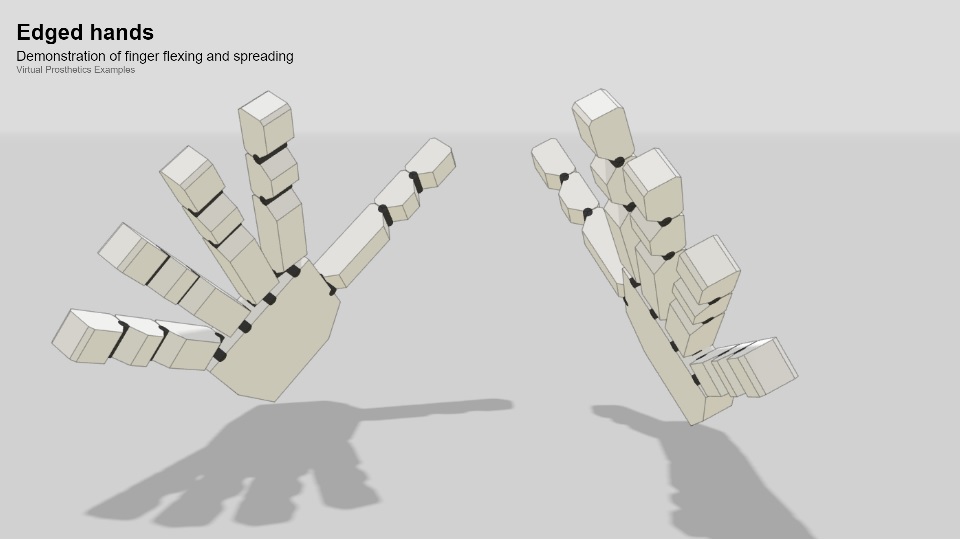
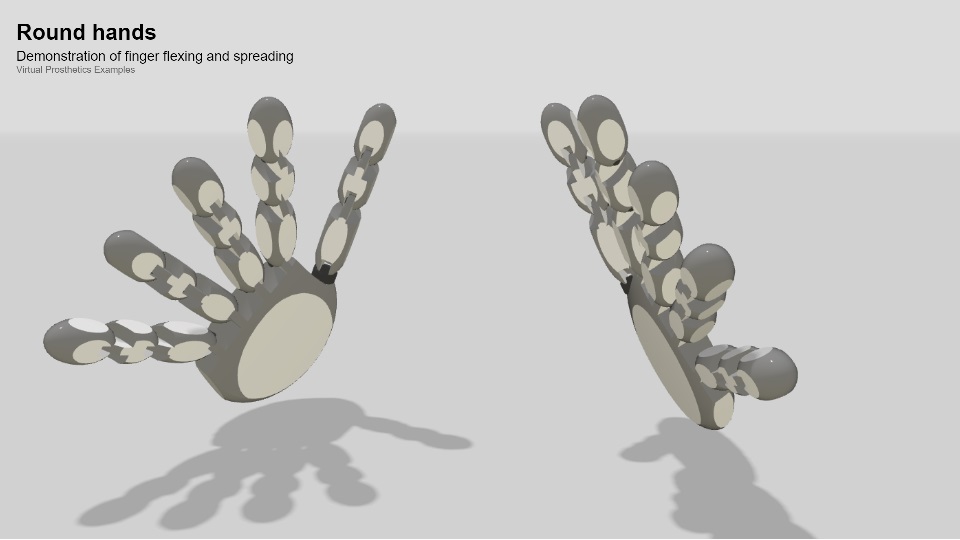
The Virtual Prosthetics defines three variants of robotic hands – edged, round and anthropomorphic.
EdgedHand
EdgedHand( isLeft )
Class. Defines an edged hand robot made of edged hand parts. If
isLeft is true, the a left hand is constructed, otherwise – a right hand.
Example:
hand = new Prosthetic.EdgedHand( true );
Source code: src/robots/edged-hand.js
RoundHand
RoundHand( isLeft )
Class. Defines a round hand robot made of round hand parts. If
isLeft is true, the a left hand is constructed, otherwise – a right hand.
Example:
hand = new Prosthetic.RoundHand( true );
Source code: src/robots/round-hand.js
AnthroHand
AnthroHand( isLeft )
Class. Defines an anthropomorphic hand robot made of round hand parts
and anthropomorphic hand parts. It extnds the RoundHand,
with additional parts for finer thumb motion. If isLeft is true, the a left
hand is constructed, otherwise – a right hand.
Example:
hand = new Prosthetic.AnthroHand( true );
Source code: src/robots/anthro-hand.js
Hands control
The edged, round and anthropomorphic hands can be controlled like other robots – individual motors can be set. The hands control provide additional options for control by setting a group of motors.
flexFinger
flexFinger( index, angle )
Method. Flexes a selected finger – the thumb has index 0, the index finger
is 1, etc. The angle is applied to all motors in the finger, that are used for
flexing.
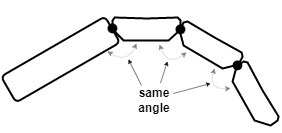
Example:
hand.flexFinger( 1, 0.5 );
flexFingers
flexFingers( angle )
Method. Flexes all fingers by given angle.
Example:
hand.flexFingers( 0.5 );
spreadFinger
spreadFinger( index, angle )
Method. Spreads a selected finger – the thumb has index 0, the index finger
is 1, etc. The angle is applied only to the base motor of the finger.
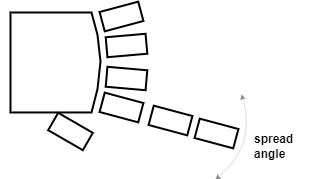
Example:
hand.spreadFinger( 3, 0.1 );
spreadFingers
spreadFingers( angle, includeThumb )
Method. Spread all fingers by given maximal angle. If includeThumb is true,
the thumb is also spread, otherwise only the rest 4 fingers are spread.
Example:
hand.spreadFingers( 0.5, false );
General parts
The general parts are predefined parts that have images. Some robot parts also have invisible physics envelopes that are used the the physics engine for collision detection.
Common shapes
Shapes are robot parts without motors. They can be positioned with setPosition and rotated with setRotation. Common shapes have exact physics envelopes and the engine uses them for precise collision detection.
Source code: src/parts/shapes.js
Ball
Ball( )
Ball( radius )
Ball( radius, color )
Class. Defines a ball shape with optional radius (by default 1) and color (by
default DimGray).
The ball has no slots.
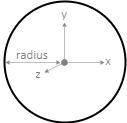
Example:
part = new Prosthetic.Ball( 2 );
Box
Box( )
Box( sizex, sizey, sizez )
Box( sizex, sizey, sizez, color )
Class. Defines a box shape with optional sizes along its axes sizex, sizey and
sizez (by default all sizes are 1), and color(by default DimGray). The box
has no slots.

Example:
part = new Prosthetic.Box( 2, 1, 2 );
External shapes
Complex shapes of robot parts can be designed with external tools like Blender and provided as GLTF or GLB files.
Source code: src/parts/gltf.js
GLTFPart
GLTFPart( filename )
GLTFPart( filename, length )
GLTFPart( filename, length, callback )
Base class. Defines a robot part with shape loaded from GLTF or GLB file with
URL in filename. The GLTF part has no slots. The length parameter (by
default it is 0) sets the intended length of the shape, so center of rotation of
the part is shifted down by length/2 from the center of the shape.
A GLTF model ia loaded asynchronously. The optional callback parameter is a
function that is called when the model is loaded. The part has no physics
envelope and no slots. A part that extends GLTFPart may add its own envelope
and slots.
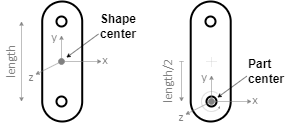
Example:
part = new Prosthetic.GLTFPart( 'myshape.glb', 2 );
recolor
gltf.recolor( fromColor, toColor, eps )
Method of GLTFPart. Changes the color of each vertex from fromColor to
toColor. Optional parameter eps defines how precise to check fromColor.
By default it is 0.01. Colors can be changed only after the 3D model is loaded
and recolor can be used in a callback function.
Motors
Robot motors are extensions of motor class with predefined axis of rotation and image. The motors have no physics envelopes and the engine ignores them during collision detection.
Source code: src/motor.js
MotorX
MotorX( min, max, def )
MotorX( min, max, def, width, height )
Class. Defines a motor that rotates around the X axis. The available range for
the rotation is from min to max. The initial value is def. The motor is
drawn as a cylinder with sizes width and height (by default width=0.1 and
height=0.05). Slot 0 is at the center of the motor.
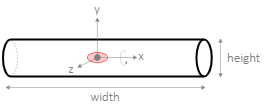
Example:
motor = new Prosthetic.MotorX( 0, Math.PI, Math.PI/2 );
MotorY
MotorY( min, max, def )
MotorY( min, max, def, width, height )
Class. Defines a motor that rotates around the Y axis. The available range for
the rotation is from min to max. The initial value is def. The motor is
drawn as a cylinder with sizes width and height (by default width=0.1 and
height=0.05). Slot 0 is at the top of the motor.
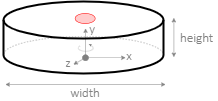
Example:
motor = new Prosthetic.MotorY( 0, Math.PI, Math.PI/2 );
MotorZ
MotorZ( min, max, def, width=0.1, height=0.05 )
Class. Defines a simple motor that rotates around the Z axis. The available
range for the rotation is from min to max. The initial value is def.
The motor is drawn as a cylinder with sizes width and height. Slot 0 is at
the center of the motor.
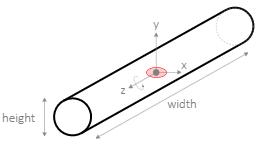
Example:
motor = new Prosthetic.MotorZ( 0, Math.PI, Math.PI/2 );
Hand parts
Hands parts are predefined robot parts that are used to build antropomorphic robots resembling a human hand. Hands parts are: a finger, a finger tip, and a palm. A more advanced version of the hand is the anthropomorphic hand that contains additional part: a thumb.

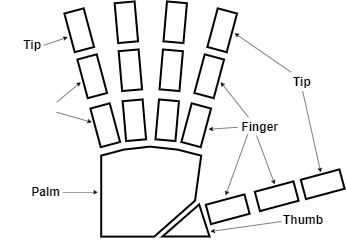
Edged hand
The edged hand parts are convex polyhedra with straight edges. The main properties of edged hand parts are:
- easily resized, preserving the overall shape
- simple shapes, less computationally intensive
- generated on-the-fly without external resources
- relatively high precision of collision detection
Source code: src/parts/edged-hand.js
EdgedFinger
EdgedFinger( )
EdgedFinger( length )
EdgedFinger( length, width, thickness )
Class. Defines an edged finger shape intended for attachment to Z-motor. The
optional parameters length (by default 1), width (by default 0.3) and
thickness (by default 0.3) define the size of the part. There is one slot
at the top at position (0,length,0).
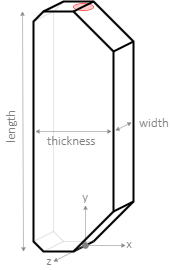
Example:
part = new Prosthetic.EdgedFinger( 1, 0.2, 0.2 );
EdgedTip
EdgedTip( )
EdgedTip( length )
EdgedTip( length, width, thickness )
Class. Defines a tip of an edged finger shape for attachment to Z-motor. The
optional parameters length (by default 1), width (by default 0.3) and
thickness (by default 0.3) define the size of the part. There are no slots.
The EdgedTip looks almost like EdgedFinger, but is intended to be the
last part of a chain of fingers.
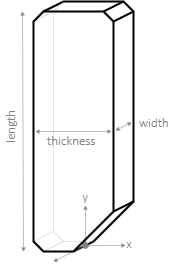
Example:
part = new Prosthetic.EdgedTip( 1, 0.2, 0.2 );
EdgedPalm
EdgedPalm( left )
EdgedPalm( left, length )
EdgedPalm( left, length, width, thickness )
Class. Defines a shape for an edged palm. The palm exists in two symmetrical
shapes. If left is true, the palm is a left-hand palm, otherwise it is a
right-hand palm. The parameters length (by default 1.4), width (by default 1.4)
and thickness (by default 0.3) define the size of the palm. There are five
slots for attaching fingers, the slot for the thumb is 0.
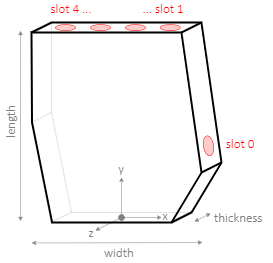
Example:
part = new Prosthetic.EdgedPalm( true, 1.5, 0.9, 0.3 );
Round hand
The round hand parts are shaped like ellipsoids and have connectors for attaching other round parts. The main properties of round hand parts are:
- fixed size, could be scaled proportionally
- smoother and more aesthetic appearance
- shapes provided from external GLTF files
- approximate precision of collision detection
Round hand parts as GLTF files use two colors – white (1,1,1) for the planar surfaces and blue (0,0.21,1) for the curved surfaces. When files are loaded for modeling a rounded hand, the blue color is changed to gray (0.3,0.3,0.3).
Source code: src/parts/round-hand.js
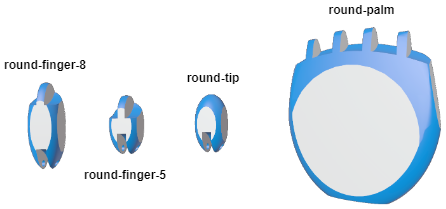
RoundFinger
RoundFinger( filename )
RoundFinger( filename, length )
Class. Defines a round finger shape intended for attachment to Z-motor. The
optional parameter length (by default 0.8) defines the intended length of the
palm. There is one slot at the top at position (0,length,0).
The round finger is used to model both a finger and a tip. The following example
defines the intended length value for the available GLTF file for round fingers:
| Part | GLTF file | Length |
|---|---|---|
| Long finger | round-finger-8.glb | 0.8 |
| Short finger | round-finger-5.glb | 0.5 |
| Tip | round-tip.glb | 0.5 |
Example:
part = new Prosthetic.RoundFinger( '../assets/gltf/round-finger-8.glb', 0.8 );
RoundPalm
RoundPalm( left, filename )
RoundPalm( left, filename, length )
Class. Defines a round palm. The palm exists in two symmetrical shapes. If
left is true, the palm is a left-hand palm, otherwise it is a right-hand palm.
Only the left palm exists as a GLTF model. The right palm is a mirror of the
left palm. The parameter length (by default 1.4) defines the intended size of
the palm. There are five slots for attaching round fingers, the slot for the
thumb is 0.
| Part | GLTF file | Length |
|---|---|---|
| Palm | round-palm.glb | 1.4 |
Example:
part = new Prosthetic.RoundPalm( true, '../assets/gltf/round-palm.glb' );
Anthropomorphic hand
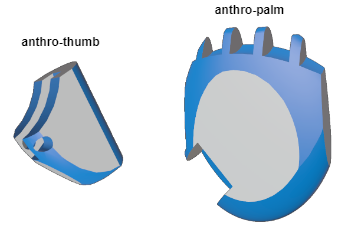
The anthropomorphic hand parts are extension to the round hand parts. They provide more detailed shapes for thumbs.
Source code: src/parts/anthro-hand.js
AnthroThumb
AnthroThumb( left, filename )
AnthroThumb( left, filename, length )
Class. Defines a round anthropomorphic thumb. The thumb exists in two symmetrical
shapes. If left is true, the thumb is a left-hand palthumb, otherwise it is a
right-hand thumb. Only the left thumb exists as a GLTF model. The right thumb is
a mirror of the left thumb. The optional parameter length (by default 1.4)
defines the intended length of the thumb. There is one slot at the top at
position (0,-0.2length,0.06length).
Example:
part = new Prosthetic.AnthroThumb( true, '../assets/gltf/anthro-thumb.glb' );
AnthroPalm
AnthroPalm( left, filename )
AnthroPalm( left, filename, length )
Class. Defines a round anthropomorphic palm. The palm exists in two symmetrical
shapes. If left is true, the palm is a left-hand palm, otherwise it is a
right-hand palm. Only the left palm exists as a GLTF model. The right palm is a
mirror of the left palm. The parameter length (by default 1.4) defines the
intended size of the palm. There are five slots for attaching round fingers,
the slot for the thumb is 0.
Example:
part = new Prosthetic.AnthroPalm( true, '../assets/gltf/anthro-palm.glb' );
API REFERENCE
Scene API
The Virtual Prosthetics library automatically creates a 3D scene that contains all created prosthetic devices.
Source code: src/scene.js
setAnimation
setAnimation( func, fps=30 )
Function. Defines a callback function func to be called fps times per second.
Higher fps (or frames-per-second) produces smoother motion, but consumes more
computational resources. The maximal value for fps is controlled by the
browser and is usually 60 or more.
The callback function has optional parameters time for the elapsed time since
the start of the library; and dTime for the elapsed time since the previous frame.
Example:
Prosthetic.setAnimation( loop, 60 );

function loop( time, dTime )
{
   // one step of the animation
};
getTime
getTime( );
Function. Gets the current time since the initialization of the library. Inside the animation loop, the time is available as a parameter.
Example:
time = Prosthetic.getTime( );
getScene
getScene( );
Function. Gets the scene as a THREE.Scene
object that can be manipulated by Three.js, e.g. for
adding custom Three.js objects.
Example:
scene = Prosthetic.getScene( );
setCameraPosition
setCameraPosition( position )
setCameraPosition( x, y, z )
Function. Places the camera at given position which is a list of coordinates
(x,y,z). The position can also be provided as three individual values.
Initially the camera is placed at (4,4,7). The camera position can be changed in
the animation loop to control its motion programmatically.
Example:
position = [10, 2, 0];
Prosthetic.setCameraPosition( position );

Prosthetic.setCameraPosition( 10, 2, 0 );
setCameraTarget
setCameraTarget( target )
setCameraTarget( x, y, z )
Function. Turns the camera towards given target which is a list of coordinates
(x,y,z). The target can also be provided as three individual values.
Initially the camera target is (0,0,0). The camera target can be changed in the
animation loop to control its rotation programmatically.
Example:
target = [0, 2, 0];
Prosthetic.setCameraTarget( target );

Prosthetic.setCameraTarget( 0, 2, 0 );
Robot API
A robot is a mechanism made of various robot parts. Some parts are just 3D shapes, others are motors or sensors.
Source code: src/robot.js
Robot
Base class. Defines the overall functionality of a robot. User-defined robots are classes that extends this base class.
Example:
class MyRobot extends Prosthetic.Robot
{
	constructor( )
	{
		super( );

		// definitions of robot parts
	}
}
attachChain
attachChain( part1, part2, ... )
Method. Used in the constructor of a custom robot to automatically connect parts
part1, part2 and so on in a chain and attach this chain to the robot. Method
attachChain(...) is a shorthand for addChain(this,...).
The result of the method is the last attached part.
Example:
class MyRobot extends Prosthetic.Robot
{
	constructor( )
	{
		super( );

		var partA = ...;
		var partB = ...;

		this.attachChain( partA, partB );
	}
}
Attaching a chain always attaches parts to slot 0. If another slot or a custom
slot position is needed, use attachToSlot.
addChain
addChain( part1, part2, ... )
Method. Used in the constructor of a custom robot to automatically connect parts
part1, part2 and so on in a chain. Method addChain is a shorthand
for a sequence of attachToSlot. The variable this can be
used to mark the robot itself. If this is used in addChain it must be the
first parameter. At least one of the chains in a robot must start with this,
otherwise the robot parts will be unattached to the robot.
The result of the method is the last added part.
Example:
class MyRobot extends Prosthetic.Robot
{
	constructor( )
	{
		super( );

		var partA = ...;
		var partB = ...;

		this.addChain( this, partA, partB );
	}
}
Adding a chain always attaches parts to slot 0. If another slot or a custom
slot position is needed, use attachToSlot.
addGUI
addGUI( title )
Method. Create interactive panel with all motors. The user can interactively
modify angles and export the gesture as a JavaScript command. The panel is made
with lil-gui library. The title is used
as a title of the controls. The default title is ‘Robot’.
Motors with names set by setName are listed with their name. All
other motors are listed with their index.
Example:
robot.addGUI( );
The GUI element of a robot is stored in property gui, which can be accessed to
modify the panel, e.g. to change the position:
robot.gui.domElement.style = 'left: 0em';
getParts
getParts( )
Method. Gets a list of all robot parts, including motors.
Example:
parts = robot.getParts( );
getMotors
getMotors( )
Method. Gets a list of all robot motors. The number of motors defines the robot’s DOF (Degree of freedom) as each motor can be manipulated independently on other motors.
Example:
motors = robot.getMotors( );
getSensors
getSensors( )
Method. Gets a list of all robot sensors.
Example:
sensors = robot.getSensors( );
getPosition
getPosition( )
Method. Gets the position of a robot as a list of [x, y, z] coordinates.
Example:
pos = robot.getPosition( );
setPosition
setPosition( position )
setPosition( x, y, z )
Method. Sets the position of a robot to position which is a list of
coordinates (x,y,z). The position can also be provided as three individual
values. If no position is provided, the robot is removed from the scene, but it
is not deleted. The default position of a robot is (0,0,0).
Example:
position = [0, 10, 5];
robot.setPosition( position );

robot.setPosition( 0, 10, 5 );
setRotation
setRotation( x, y, z, order='XYZ' )
Method. Sets the orientation of a robot defined by Euler angles
(x,y,z) and optional order of rotations.
Example:
robot.setRotation( 0, Math.PI/2, 0 );
getAngle
getAngle( index )
Method. Gets the angle of the index-th motor. If such motor does not exist,
the result is 0. Use getAngles to get all angles at once.
Example:
a = robot.getAngle( 1 );
setAngle
setAngle( index, angle )
Method. Sets the angle of the index-th motor. If such motor does not exist
or if the angle is null, the operation is ignored. Use
setAngles to set all angles at once.
Example:
robot.setAngle( 1, Math.PI );
getAngles
getAngles( )
Method. Gets an array with angles of all motors. Use getAngle to
get an individual angle.
Example:
a = robot.getAngles( );
setAngles
setAngles( angle1, angle2, ... )
Method. Sets the angles angle1, angle2, … of all motors. If a value of
some angle is null, then the corresponding motor’s angle is unchanged. Use
setAngle to set an individual angle.
Example:
robot.setAngles( Math.PI, 0, -Math.PI/2 );
Part API
Part
Base class. Defines the core functionality of a robot part. Parts used in robots are extensions of this base class. Each part may have slots where other parts can be attached. Motors and sensors are parts too. The base class part is invisible and has no 3D shape.
addSlot
addSlot( x, y, z )
Method. Adds a new slot to a robot part. The slot is at coordinates
(x,y,z) relative to the part. To rotate a slot use its method
setRotation.
Example:
part.addSlot( 2, 0, 1 );
attachToSlot
attachToSlot( parent )
attachToSlot( parent, slot=0 )
Method. Attaches the part to a slot of the parent part. The slot can be
a number for the slot index or a Slot object. If no slot is given,
the part is attached to the first slot of the parent. If the parent has no slots, the the part is attached to the parent itself.
Example:
partB.attachToSlot( partA );
partB.attachToSlot( partA, 2 );
partB.attachToSlot( partA, new Prosthetic.Slot(0,3,0) );
beginContact
beginContact( otherPart )
Method. This method is automatically called when the physics engine detects a
contact of this part with another part. The other part is passed as
otherObject parameter. The beginContect method is used to define a reaction
on collision of parts.
Example:
class MyPart extends Part
{
	beginContact( otherPart )
	{
		// reaction of contact
	}
}
endContact
endContact( otherPart )
Method. This method is automatically called when the physics engine detects a
lost of contact of this part with another part. The other part is passed as
otherObject parameter. The endContect method is to define a reaction when
a part parts away from another part.
Example:
class MyPart extends Part
{
	endContact( otherPart )
	{
		// reaction of lost contact
	}
}
setPosition
setPosition( position )
setPosition( x, y, z )
Method. Sets the position of a part to position which is a list of
coordinates (x,y,z). The position can also be provided as three individual
values. The position is relative to the part’s parent. The method setPosition
is used to manually set the position of a part. When a part is attached to a
slot, it assumes its position. If a part is not attached, then its position is
in the 3D scene.
Example:
position = [0, 10, 5];
part.setPosition( position );

part.setPosition( 0, 10, 5 );
setRotation
setRotation( x, y, z, order='XYZ' )
Method. Sets the orientation of a part to Euler angles
(x,y,z) and order of rotations. The rotation is relative to the part’s parent.
The method setRotation is used to manually set the orientation
of a part. When a part is attached to a slot, it assumes its orientation. If a part
is not attached, then its orientation is in the 3D scene.
Example:
part.setRotation( 0, Math.PI/2, 0 );
Motor API
Motors are parts that can rotate around a predefined axis and have DOF=1. Several motors can be attached in a row in order to achieve complex rotation and higher DOF. As motors are parts, all methods of parts are available for motors too.
Source code: src/motor.js
Motor
new Motor( axis, min=-Infinity, max=Infinity, def=0 )
Base class. Defines the overall functionality of a motor. User-defined motors
are classes that extends this base class. Each motor has one axis of rotation,
one of the strings 'x', 'y' or 'z'. The range of rotation is bound by
min and max, and the default angle is def. The base motor has no image.
setName
setName( name )
Method. Sets a custom name for a motor. Originally all motors are unnamed. Names can be used for user interfaces to provide more meaningful reference to a motor. The method returns the motor itself, so the method can be chained.
Example:
motor.setName( 'Base rotor' );
getAngle
getAngle( )
Method. Gets the angle of a motor.
Example:
a = motor.getAngle( );
setAngle
setAngle( angle )
Method. Sets the motor’s angle. If angle is null, the operation is ignored.
Example:
motor.setAngle( Math.PI );
flip
flip( bool )
Method. Reverts the motor’s motion in the opposite direction if bool is true.
This is used when modeling left-oriented and right-oriented symmetrical robots
(e.g. left hand and right hand).
Example:
motor.flip( true );
Slot API
A slot is a place on a robot part where another part can be attach. The orientation of the slot affects the orientation of the attached part. Several parts can be attached to one slot.
Source code: src/slot.js
Slot
Slot( )
Slot( position )
Slot( x, y, z )
Class. Defines a slot at a given position which is a list of coordinates
(x,y,z). The position can also be provided as three individual values. These
coordinates are relative to the robot part to which the slot is added with
addSlot. If no position is provided, the slot is created at (0,0,0).
Example:
slot = new Prosthetic.Slot( );

position = [0, 4, 1];
slot = new Prosthetic.Slot( position );

slot = new Prosthetic.Slot( 0, 4, 1 );
setPosition
setPosition( position )
setPosition( x, y, z )
Method. Sets the slot’s position which is a list of coordinates (x,y,z). The
position can also be provided as three individual values.
Example:
position = [0, 10, 5];
slot.setPosition( position );

slot.setPosition( 0, 10, 5 );
setRotation
setRotation( x, y, z, order='XYZ' );
Method. Sets the orientation of a slot to Euler angles
(x,y,z) and order of rotations. The orientation is relative to the robot
part of the slot.
Example:
slot.setRotation( 0, Math.PI/2, 0 );
Sensor API
A sensor is a robot part that measures some property and returns its value as a
feedback. Sensors are attached to slots (with attachToSlot)
and use their position and orientation. Sensors are also robot parts so they
have their methods like setPosition and setRotation.
Source code: src/sensor.js, src/laser.js and src/textures.js
Sensor
Sensor( visible=true, laserColor )
Class. Defines a sensor. If visible is true, the sensor pad is drawn,
otherwise the sensor is invisible, but still functional. If present, laserColor
defines the color of a laser beam, emitted by the sesonsor. The value of
laserColor is color name,
Three.js Color or just true
for a default crimson color.

Example:
sensor = new Prosthetic.Sensor( );
senseDistance
senseDistance( )
Method. Gets the distance from the sensor position to the nearest object
(including the ground) along the direction of the sensor. If there is no object,
the result is Infinity. The minimal sensed distance is 0.05, which is the sizes
of the sensor pad.
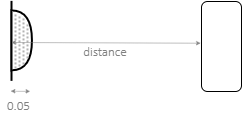
Example:
dist = sensor.senseDistance( );
senseTouch
senseTouch( )
Method. Gets the close-up distance from the sensor position to the nearest object (including the ground) along the direction of the sensor. Touching is similar to sensing distance, but it only senses distances from 0 to 0.05, i.e. inside the sensor pad. The returned value is a number from 0 to 1 indicating the level of touching, i.e. 0 means no touching, 1 means complete touching. If there is no object that close, the result is 0.

Example:
touch = sensor.senseTouch( );
sensePosition
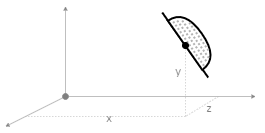
sensePosition( )
Method. Gets the 3D position of the sensor as an array of [x,y,z] coordinates.
Example:
pos = sensor.sensePosition( );
senseCollision
senseCollision( )
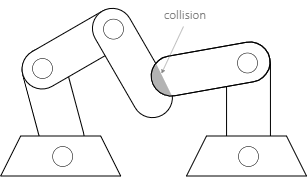
Method. Returns true when the part containing the sensor collides (or
intersects) another part or the ground, otherwise returns false. Collision
sensing relies on the physics engine and is aware of only those parts, that are
defined as physical parts.
Example:
if( sensor.senseCollision( ) )
{
   ...
}
senseObjects
senseObjects( )
Method. Returns a list of all parts that collide (or intersects) with the part, containing the sensor. Sensing objects relies on the physics engine and is aware of only those parts, that are defined as physical parts.
Example:
objects = sensor.senseObjects( );
senseObject
senseObject( otherObject )
Method. Returns true when the part containing the sensor collides (or
intersects) the otherObject, otherwise returns false. Sensing objects relies
on the physics engine and is aware of only those parts, that are defined as
physical parts.
Example:
if( sensor.senseObject( ball ) )
{
   ...
}
